Guidance for Creating Meaningful, Restorative & Engaging Online Learning
Leading an online training can feel intimidating but by preparing well you can create an experience that leverages the advantages of online training and energizes and inspires you and the participants. In this document you will find instruction on Preparation, Training Design, and Game Day Tips. I've also created two 15-minute video tutorials These tips are particularly relevant to trainers and facilitators looking to create the conditions for authentic and meaningful sharing and engagement.
For best learning outcomes read through this packet and then watch these two videos:
Part 1: In this 14 minute video I demonstrate and review info in this packet, including what an online poll looks like, and more tips.
Part 2: In this 15-minute video I go through the technical aspects of working with ZOOM and some tips on how to help people to slow down.
Visit here for a PDF version of this article.
Visit here for a sample circle script for teachers using break out rooms.
Preparation
Thorough preparation is key to a successful online event. For in-person events we carefully prepare our handouts, slides, and learning aids. We walk into the space and immediately start setting it up for success. The same prep needs to happen for online events except your “space” is your computer desktop and your physical desktop.
In this section I will review the pieces you will need to prepare and have ready in your browser as open tabs for the event.
- slides to guide the training,
- a polling application like mentimeter.com,
- session agenda,
- facilitator guide (printed out),
- break out session protocols,
- resources that are referenced in your talks,
- links document (a list of links to the documents listed here)
Survey
Because you cannot read participants’ level of engagement or understanding as well online it is common to feel your confidence wax and wane throughout the session. Sending out a survey as part of a Learning Needs & Resources Assessment beforehand not only makes for a better training, it can help you maintain confidence more easily by knowing what they expect and want to learn, questions or requests they have, and their previous experience or knowledge.
Slides
Prepare slides that guide participants and capture their attention. It is easy for attendees to become distracted by other tasks so having a focus point is crucial. But remember that it’s easy to rely too much on slides during online training sessions. Don’t do it! It’s fine for a recorded training, but not for a live event.
Remember to toggle back and forth between sharing slides and your face so that you and they do not lose touch with the human element. Your energy and your presentation will become flat if you just run through a bunch of slides.
Design: Font size on slides can be smaller since they are looking at their screen, but the same rules apply. No more than one main topic per slide and use bullet points and “animation” to present points. And remember, they can read the words on the slide, they can listen to you read the words, or they can listen to you talk, but they can’t do all three!
Polling App
I use mentimeter.com to ask warm up/check-in questions along with questions that illuminate our diversity and shared humanity. For many folks, sharing in a virtual space is more difficult because they can’t see body language. This tool provides a great opportunity to connect and build trust and belonging. I structure questions from easy low-stakes, to more personal, and then shift to content questions like “what is one thing you hope to gain from this training.”
Mentimeter is free if you just want to ask a few questions. The annual rate is pretty low. There are other polling apps you can use. During my video Part 1, I offer an example of four questions I used to successfully bring together a group of 45 people who did not know each other.
Tips:
- Choose the Wordle option for a check in, asking folks to offer one word to describe how they feel today. People love watching the Wordl come alive on screen.
- As you will see in my demonstration, posing an open ended question can be very powerful. Just remember that they can result in some unexpected or offensive responses. For these reason I rarely. use them with students or groups I don't know. If I do, I will turn off the screen share until I've had a chance to review them.
- Take advantage of the option to download the polling results and use them in a follow up email or training session.
How to present it:
- Have the menti.com user tab open and ready to go in your browser along with your account page.
- Begin the training with a slowing down as described in Part 2 video and then let folks know you are going to use a polling app to check in. They can use their phone or computer.
- From ZOOM, share your screen and choose the Menti.com tab. Ask them to type in menti.com and enter the code. (Sharing your screen is demonstrated in Part 2 video)
- Watch the number of respondents grow on the bottom of the screen in silence or read responses. When everyone or nearly everyone has responded advance to the next screen.
- After you’re through all the questions, "stop share" your screen and come back to the "main session'
- Take time to reflect on the experience by asking folks to type into the chat one thing that surprised them from the polling. Or one thing they noticed.
Note: I know you want to get to content! But, understand that by slowing down to do this work will result in more meaningful engagement for them and a more energizing experience for you.
Agenda
- Create a very clear agenda that allows folks to see what you will be asking of them. Send it to them ahead of time. Because you are not printing it out, use a lot of white space and graphics. Make it fun and engaging.
- Make your email and agenda as HUMAN and warm as possible. Include a photo of yourself alone or working with participants from another training if possible. You will not be able to connect physically on the day of the training so it helps a lot to add these human touches.
- At the beginning of your session you will share an agenda link in the chat for people to access who did not see it in their email. (more on this in video part 2.!) As late attendees enter the session repost the link if you can remember!
- As you go through the agenda, you can choose to share your agenda or not. I often put the agenda on slides.
Facilitator Guide (printed out)
When you do an online training session you can easily become overwhelmed with all the tabs you have open! It’s amazing how quickly my heart can start to pound as I struggle to find the right tab. SO, it is really helpful to put thought into how you order your tabs and print out a facilitator’s guide and have it on your desk, especially the first few times. Things you would include in this guide:
- A script to lead a mindful moment.
- Step by step instructions around certain pieces you are nervous about.
- Poems you want to read. Especially helpful to offer as a pause in between content-dense sessions.
- Technical points you want to go over at the beginning of the training, including:
- How to mute and unmute (everyone needs to mute until they talk to limit feedback)
- How to turn on/off the camera
- How to comment to everyone or to another person privately. And the reasons why you might use chat: to appreciate someone else’s comment, click on a link, respond to a prompt.
- How to “raise” your hand.
- How to change from speaker view to gallery view. “Speaker view” can help us connect with the speaker.
- How to turn off video if they are experiencing connectivity issues. And ask them to let people know in the chat.
- How to enlarge or shrink the chat.
- Online etiquette
- Close tabs and apps that might distract us from being present.
- Turn phone to silent or vibrate.
- Pause before speaking to allow folks to finish their thoughts
- Turn camera off if you need to move or talk with someone at home, otherwise keep it on.
- Overview of process
- Let people know you will be sharing links in the chat throughout the training to reference.
- They will be in small groups and big groups with a protocol.
- You will be sharing slides.
Put it all in one doc and print it out in a yellow or other bright color so it is easy to locate on your desk.
Break Out Session Protocols
Break out sessions are essential to all trainings and meetings, regardless of size. As a participant myself, I grow quickly weary of staying in a large group and love the opportunity to meet up with a few people or even just a partner. However, these break out sessions can be stressful and inequitable if a clear protocol is not provided. Just remember that they are well worth the time and prep. Participants love them and they give you a much-needed break to re-orient. (Tip: do not take that break time to answer emails or do other work. I find it hard to reorient when they return. Instead, stay with the training and drop in on the break out rooms.)
I do think that open ended sharing is fine in groups of 12 or less. And in groups of 20 you can have everyone share with some constraint like “share one word.” However, I find that break out rooms are helpful regardless of size because people don’t have body language to either encourage them to talk more or to help them remember to share the floor.
To prepare to use break out rooms do the following:
- Decide how many people you want in a room and have a calculator handy to determine how many rooms you should create. (Attendance can change dramatically! So you might need to adjust on the spot.)
- Decide on the protocol you want to use to engage in the learning process or simply connect and share.
- Create a protocol that includes:
- A structured opportunity to pause, introduce themselves and connect.
- Time to assign roles in the group.
- A clear assignment they are meant to complete, even if it is to decide what they will share out to the big group.
- Time limits for sharing in order to insure equal voice.
Here is a sample protocol of a basic break out session.
Here is a sample protocol for a break out during a whole school virtual circle where they started the circle all together and then broke out to do more in-depth sharing.
More about how to facilitate break out sessions is shared in Part 2 video.
Resources
As you go through your training you will most likely mention a book, an article, a video, etc. In order to add those links to your chat seamlessly, have them listed on that Links doc you created.
Ideally, you have a co-facilitator who is in charge of the chat—adding resources and answering questions. But if you are alone please just be transparent and say, “I am going to pause us for a second to check the chat for questions.” Allow the silence as you go through the chat, and read them aloud if they are relevant.
In an in-person event we have plenty of silent pauses as we pass out handouts, turn on the projector, move people in groups. We don’t have these pauses online, so allow them to happen and slow down.
Training Design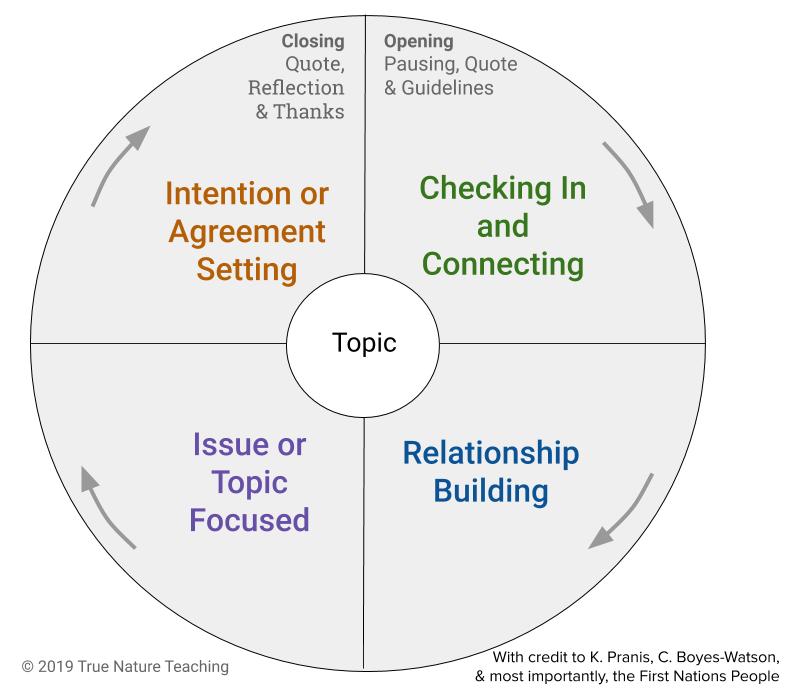
Apply the same best practices guidelines to your online training as you do in person. For me that means following the restorative Balance in the Process.
- Begin with a slowing down, acknowledgement, and intention setting. Remind them that they will connect with what they are meant to learn and should not feel like they need to learn every single thing. I like to acknowledge what I think might be present in the room connected to being a teacher, a parent, the state of the world, etc. I also acknowledge the limitations of online learning and invite them to take breaks just as they would at an in person training.
- I then provide an opportunity for everyone to build connections and relationships with each other and the content through polling and/or break out rooms. Even taking the time to pair people up is very helpful.
- Next we get to the issue/ information that is to be explored. I use the Dialogue Education model of the Four A’s:
- ANCHOR: Have attendees connect to content by reflecting on and sharing through chat or pairs. A prompt is provided related to the content. For example, training around restorative communication I might ask, “Reflect on a time when you received difficult feedback. What needs have to be met for you to be able hear that feedback well? If they aren’t met, what feelings arise? What was your reaction to the feedback?”
- ADD: Add the new content in chunks they can apply. So using my example, I might teach them about the concept of feelings, needs, and strategies as being central to restorative communication and provide a script to practice.
- APPLY: Give them an opportunity to apply their knowledge. In my case, I asked them to consider a real life example that’s not too emotionally loaded, write out the script and then practice with the partner.
- AWAY: The last part is to name how this new knowledge will be taken away and used in their work or life.
- After many cycles of the Four A’s throughout the training session (depending on time) I always leave time for a closing in order to finish the Balance in the Process. A closing can be many things, but its main purpose is to bring us back together, reflect on our learning and our time together, and set intentions. Some things you might do online:
- Ask them to reflect on how they feel and type one word in the chat. The facilitator then reads them out .
- Ask them to write out what they appreciated about the day, their fellow participants, the information. Read out as they type.
- Ask them to name one thing they are willing to commit to. You can save the chat and reflect those commitments to them in your post session email.
- Read a poem and ask folks to call out the words or phrases that speak to them.
Game Time!
- Part 1: Video demonstrating these preparations above. More tips are provided with visual demonstrations. (15 min.)
- Part 2: Video showing the mechanics of working with ZOOM. I go through the actual mechanics. (15 min)